TestNG是什么?
TestNG是一个自动化测试框架,NG代表“下一代”。TestNG的灵感来自于 JUnit ,使用注释(@)。TestNG克服了JUnit的缺点,旨在使 端到端测试 轻松点。
使用TestNG,可以生成正确的报告,并且可以很容易地知道有多少测试用例通过、失败和跳过。可以单独执行失败的测试用例。
例如:
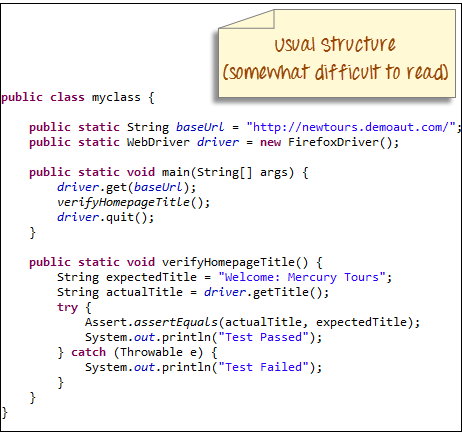
- 假设有五个测试用例,为每个测试用例编写一个方法(假设程序是使用main方法编写的,而不使用TestNG)。。这种场景就需要TestNG
- Selenium中的TestNG提供了一个选项,即test-output文件夹中的testng-ailed.xml文件。它将只执行失败的测试用例。
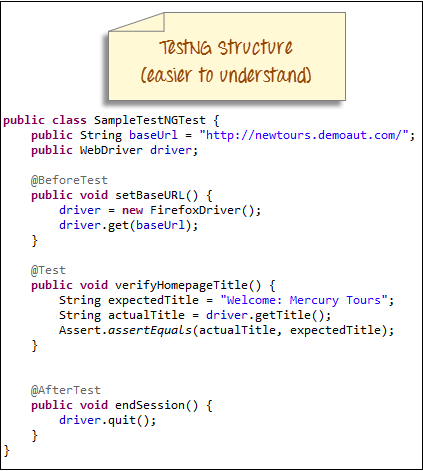
除了上述概念之外,还将了解更多关于TestNG的内容,比如TestNG的优势是什么,如何使用@test注释创建测试方法,如何将这些类转换为测试套件文件并通过Eclipse和命令行执行。
在本TestNG教程中,将了解
- 为什么使用含Selenium的TestNG?
- TestNG相对于JUnit的优势
- 使用TestNG注释创建测试用例
-
如何创建新的TestNG测试文件
- 我们的第一个TestNG测试用例示例的编码
- 运行测试 运行测试
- TestNG创建的报告
- TestNG中使用的标注
- 多个测试用例
为什么使用含Selenium的TestNG?
默认Selenium测试不会为测试结果生成报告。在TestNG中使用Selenium,可以生成测试报告。
大多数Selenium用户使用它的次数甚至超过了JUnit。TestNG有这么多特性,但我们将只关注最重要的特性。以下是Selenium测试的主要功能:
- 以适当的格式生成报告,包括运行的测试用例数量、通过的测试用例数量、失败的测试用例数量和跳过的测试用例数量。
- 通过将多个测试用例转换为testng.xml文件,可以更容易地进行分组。其中可以确定应该首先执行哪个测试,用例的优先级。
- 只需使用名为“调用计数”的关键字,同一个测试用例就可以在没有循环的情况下多次执行。
- 使用TestNG,可以在多个浏览器上执行多个测试用例,即浏览器测试。
- TestNG框架可以很容易地与TestNG Maven、Jenkins等工具集成。
- 测试中使用的注释非常容易理解,例如: @BeforeMethod 、 @AfterMethod 、 @BeforeTest 、 @AfterTest
- WebDriver没有用于生成报告的本机机制。TestNG可以以如下所示的可读格式生成报告。
- TestNG简化了测试的编码方式。操作的顺序由易于理解的批注控制,这些批注不要求方法是静态
- 未捕获的异常由TestNG自动处理。这些异常在报告中显示为失败。
TestNG相对于JUnit的优势
与JUnit相比,TestNG有三个主要优势:
- 注解更容易理解
- 可以对测试用例进行分组
- 支持并行测试
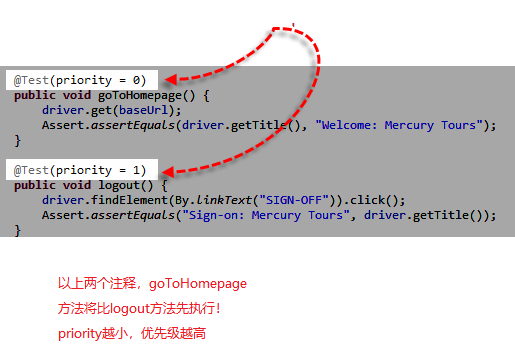
TestNG中的注解是可以控制如何执行方法 。它们的前面总是有下面显示的是一个优先级示例。
需要注意的是,TestNG中的注解比JUnit中的注释更容易编码和理解。 TestNG中提供了并行运行测试的能力,但JUnit中没有,因此使用Selenium Grid的测试人员更倾向使用TestNG框架。
使用TestNG注解并创建测试用例
现在,将学习如何使用Selenium中的TestNG注释创建第一个测试用例: 在创建测试用例之前,应首先在Eclipse中设置一个新的TestNG项目,并将其命名为“FirstTestNGProject”。
设置新的TestNG项目
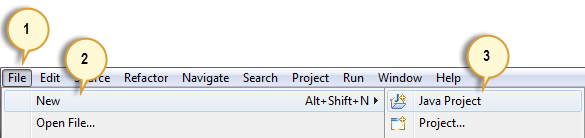
步骤1: 单击文件>新建> Java语言项目
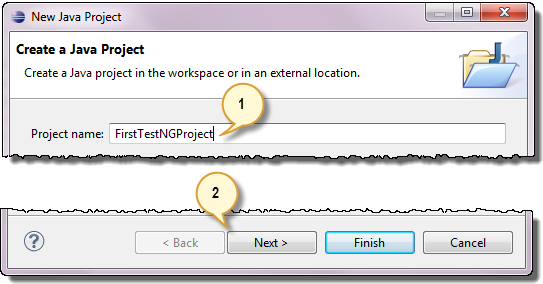
步骤2: 键入“FirstTestNGProject”作为项目名称,然后单击Next。
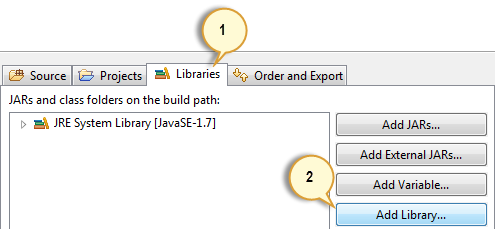
步骤3: 我们现在将开始将TestNG库导入到我们的项目中。单击“库”选项卡,然后单击“添加库…”
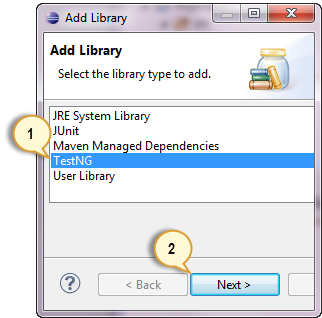
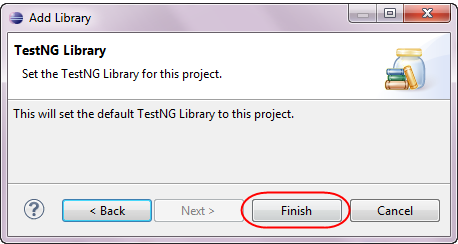
步骤4: 在“添加库”对话框中,选择“TestNG”,然后单击“下一步”。
步骤5: 单击完成。
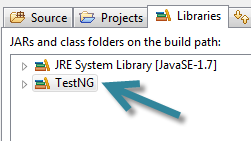
应该注意到,TestNG包含在库列表中。
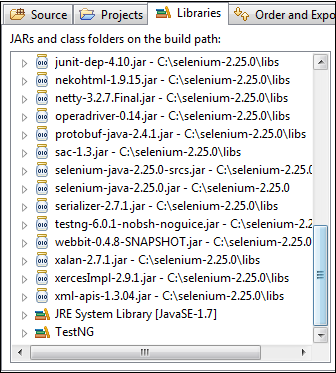
步骤6: 现在将添加包含Selenium API的JAR文件。
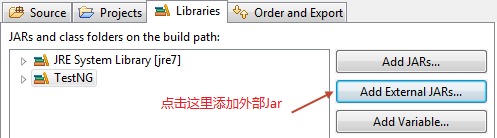
然后,导航到放置Selenium JAR文件的位置。
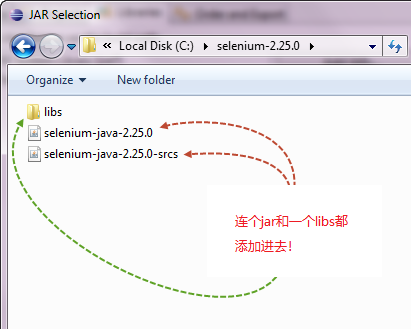
添加外部JAR之后,屏幕应该如下所示。
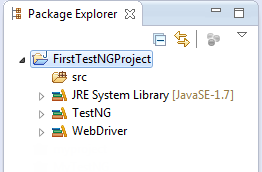
步骤7: 单击Finish并验证我们的FirstTestNGProject在Eclipse的package Explorer窗口中是否可见。
如何创建新的TestNG测试文件
现在我们已经完成了本TestNG教程中的项目设置,继续创建一个新的TestNG文件。
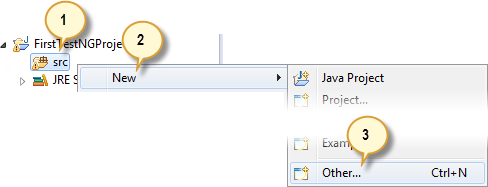
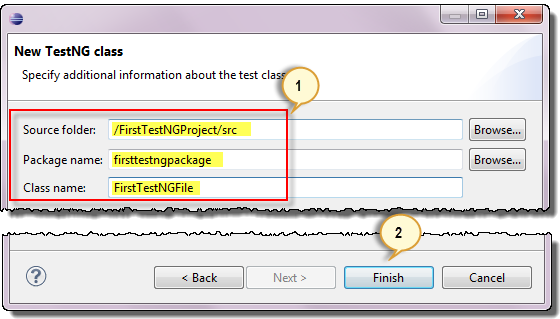
步骤1: 右键单击“src”软件包文件夹,然后选择“新建”>“其他…
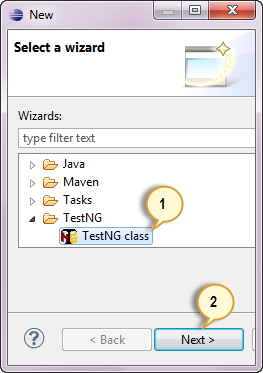
步骤2: 单击TestNG文件夹并选择“TestNG class”选项。单击下一步。
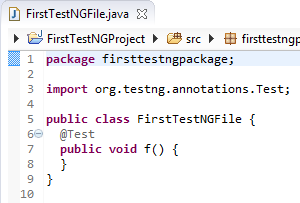
步骤3: 在相应的输入框中键入下面指示的值,然后单击“完成”。注意,我们已将Java文件命名为“FirstTestNGFile”。
Eclipse应该会自动为我们的TestNG文件创建模板,如下所示。
TestNG测试用例示例
现在创建第一个测试用例,检查itxiaonv的主页是否正确。键入代码,如下面的TestNG示例所示:
 package firsttestngpackage;
import org.openqa.selenium.*;
import org.openqa.selenium.firefox.FirefoxDriver;
import org.testng.Assert;
import org.testng.annotations.*;
public class firsttestngfile {
    public String baseUrl = "http://www.itxiaonv.com";
    String driverPath = "C:\\geckodriver.exe";
    public WebDriver driver ;
    @Test
    public void verifyHomepageTitle() {
        System.out.println("launching firefox browser");
        System.setProperty("webdriver.gecko.driver", driverPath);
        driver = new FirefoxDriver();
        driver.get(baseUrl);
        String expectedTitle = "Welcome: Mercury Tours";
        String actualTitle = driver.getTitle();
        Assert.assertEquals(actualTitle, expectedTitle);
        driver.close();
    }
}
注意以下事项:
- TestNG不要求具有 main() 方法。
- 方法不一定是静态。
- 使用@Test注释。 @Test用于判断其下的方法为测试用例 。在本例中, verifyHomepageTitle() 方法设置为测试用例,因此在其上面放置了一个“ @Test ”注解。
- 由于在TestNG中使用了注释,因此需要导入org.testng.annotation.*包。
- 使用Assert类。 Assert类用于在TestNG中执行验证操作 。要使用它,我们需要导入org.testng.Assert包。
在单个TestNG文件中可能有多个测试用例(因此,有多个@Test注解)。
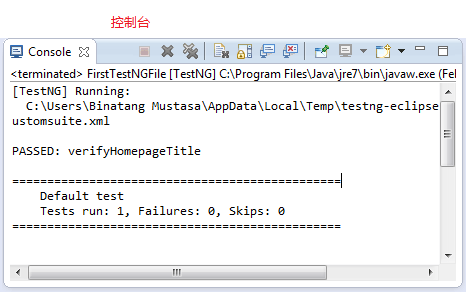
运行测试
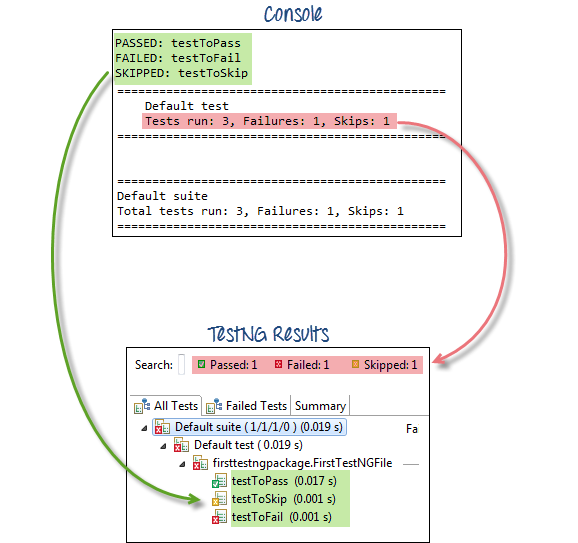
要运行测试,只需像往常一样在Eclipse中运行文件。Eclipse将提供两个输出-一个在控制台窗口中,另一个在TestNG结果窗口中。
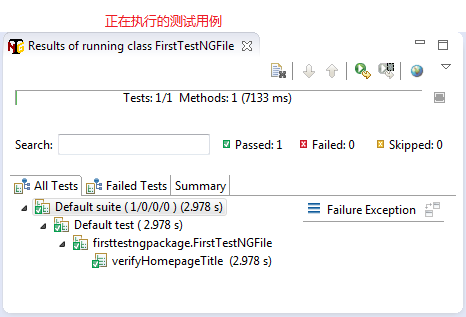
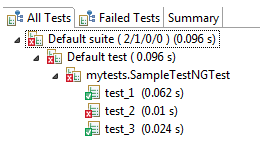
TestNG创建测试报告
Eclipse中的控制台窗口给出了测试用例结果报告,而TestNG结果窗口给出了一个图形化的报告。
生成HTML报告
TestNG能够生成HTML格式的报告。
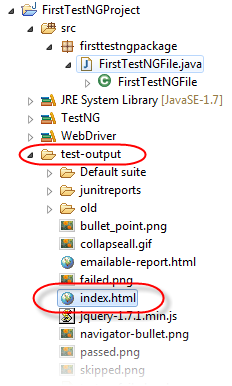
步骤1: 在运行我们在上一节中创建的FirstTestNGFile之后,在Project Explorer窗口中右键单击项目名称(FirstTestNGProject),然后单击“Refresh”选项。

步骤2: 注意,创建了一个“test-output”文件夹。此HTML文件是最近一次测试运行结果的报告。
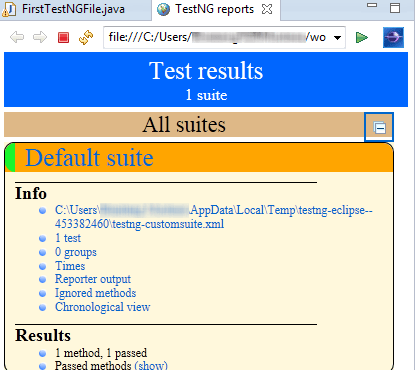
步骤3: 双击index.html文件以在Eclipse的内置Web浏览器中打开它。可以在重新运行测试后随时刷新此页面,只需像在普通Web浏览器中一样按F5即可。
TestNG中使用的标注
在前一节中,我们已经向介绍了@Test注解。现在,我们将学习更高级注解及其用法。
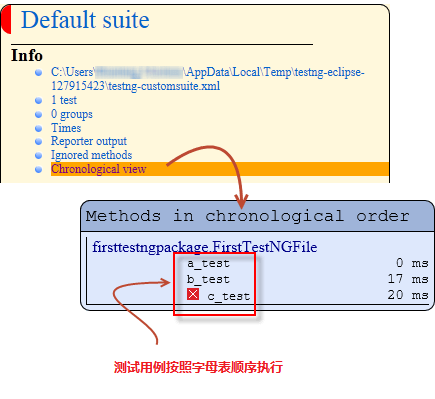
多个测试用例
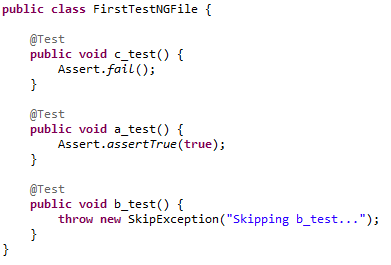
可以在单个TestNG文件中使用多个@Test注释。虽然c_test、a_test和b_test方法在代码中没有按字母顺序排列,但它们将按字母顺序执行。
运行此代码,并在生成的index.html页面上单击“按时间顺序排列的视图”。
参数
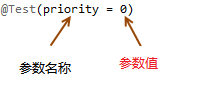
如果希望以不同的顺序执行这些方法,使用参数“priority”。 参数是修改函数的关键字 。
- 参数要求为其赋值。可以在它们旁边放置一个“=”,然后跟上值。
- 参数括在一对圆括号中,放在注解之后,如下面的代码片段所示。
TestNG将以最低至最大的优先级值执行@Test注释。优先级值没有必要是连续的。
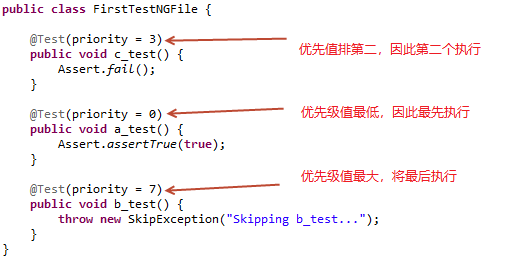
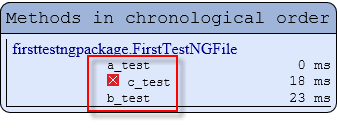
TestNG HTML报告将确认这些方法是基于优先级的升序值执行的。
多参数
除了“priority”之外, @Test还有另一个名为 “alwaysRun”的参数,该参数只能设置为“true”或“false”。 要在单注解中使用两个或多个参数,用逗号分隔它们 如下图所示。
@Test(priority = 0, alwaysRun = true)
@BeforeTest和 @AfterTest
| 注解 | 说明 |
|---|---|
| @BeforeTest | 将执行此批注下的方法 在TestNG文件中的第一个测试用例之前 。 |
| @AfterTest | 将执行此批注下的方法 在执行完TestNG文件中的所有测试用例之后 。 |
考虑下面的代码。
 package firsttestngpackage;
import org.openqa.selenium.*;
import org.openqa.selenium.firefox.FirefoxDriver;
import org.testng.Assert;
import org.testng.annotations.*;
public class firsttestngfile {
    public String baseUrl = "http://www.itxiaonv.com/test/newtours/";
    String driverPath = "C:\\geckodriver.exe";
    public WebDriver driver ;
    @BeforeTest
    public void launchBrowser() {
        System.out.println("launching firefox browser");
        System.setProperty("webdriver.gecko.driver", driverPath);
        driver = new FirefoxDriver();
        driver.get(baseUrl);
    }
    @Test
    public void verifyHomepageTitle() {
        String expectedTitle = "Welcome: Mercury Tours";
        String actualTitle = driver.getTitle();
        Assert.assertEquals(actualTitle, expectedTitle);
    }
    @AfterTest
    public void terminateBrowser() {
        driver.close();
    }
}
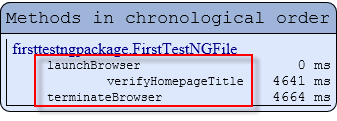
应用表和上面的代码提供的逻辑,我们可以预测执行方法的顺序是:
- 首先 — launchBrowser()
- 然后– verifyHomepageTitle()
- 最后– terminateBrowser()
可以互换注解块的位置,而不会影响执行它们的时间顺序 。如下,通过一个TestNG示例来理解,并重新排列注解块,代码如下:
 package firsttestngpackage;
import org.openqa.selenium.*;
import org.openqa.selenium.firefox.FirefoxDriver;
import org.testng.Assert;
import org.testng.annotations.*;
public class firsttestngfile {
    public String baseUrl = "http://www.itxiaonv.com/test/newtours/";
    String driverPath = "C:\\geckodriver.exe";
    public WebDriver driver ;
    @AfterTest                            //Jumbled
    public void terminateBrowser() {
        driver.close();
    }
    @BeforeTest                            //Jumbled
    public void launchBrowser() {
        System.out.println("launching firefox browser");
        System.setProperty("webdriver.gecko.driver", driverPath);
        driver = new FirefoxDriver();
        driver.get(baseUrl);
    }
    @Test                                //Jumbled
    public void verifyHomepageTitle() {
        String expectedTitle = "Welcome: Mercury Tours";
        String actualTitle = driver.getTitle();
        Assert.assertEquals(actualTitle, expectedTitle);
    }
}
运行上面的代码,注意
@BeforeMethod和 @AfterMethod
| 注解 | 说明 |
|---|---|
| @BeforeMethod | 将执行此注解下的方法 在每个测试用例中的每个方法之前 。 |
| @AfterMethod | 将执行此注解下的方法 在每个测试用例中的每个方法之后。 |
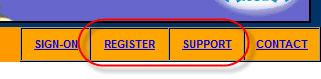
在如下网页中,假设想要验证下面两个链接的目标页面的标题。
测试流程如下:
- 转到主页并验证其标题。
- 单击注册并验证其目标页面的标题。
- 返回主页并验证其标题是否仍然正确。
- 单击支持并验证其目标页面的标题。
- 返回主页并验证其标题是否仍然正确。
下面的代码说明了如何使用@BeforeMethod和 @AfterMethod来高效地执行上面测试用例 。
 package firsttestngpackage;
import org.openqa.selenium.*;
import org.openqa.selenium.firefox.FirefoxDriver;
import org.testng.Assert;
import org.testng.annotations.*;
@Test
public class firsttestngfile {
    public String baseUrl = "http://www.itxiaonv.com/test/newtours/";
    String driverPath = "C:\\geckodriver.exe";
    public WebDriver driver;
    public String expected = null;
    public String actual = null;
    @BeforeTest
    public void launchBrowser() {
        System.out.println("launching firefox browser");
        System.setProperty("webdriver.gecko.driver", driverPath);
        driver= new FirefoxDriver();
        driver.get(baseUrl);
    }
    @BeforeMethod
    public void verifyHomepageTitle() {
        String expectedTitle = "Welcome: Mercury Tours";
        String actualTitle = driver.getTitle();
        Assert.assertEquals(actualTitle, expectedTitle);
    }
    @Test(priority = 0)
    public void register() {
        driver.findElement(By.linkText("REGISTER")).click() ;
        expected = "Register: Mercury Tours";
        actual = driver.getTitle();
        Assert.assertEquals(actual, expected);
    }
    @Test(priority = 1)
    public void support() {
        driver.findElement(By.linkText("SUPPORT")).click() ;
        expected = "Under Construction: Mercury Tours";
        actual = driver.getTitle();
        Assert.assertEquals(actual, expected);
    }
    @AfterMethod
    public void goBackToHomepage ( ) {
        driver.findElement(By.linkText("Home")).click() ;
    }
    @AfterTest
    public void terminateBrowser() {
        driver.close();
    }
}
执行此测试后,TestNG应该报告以下序列。
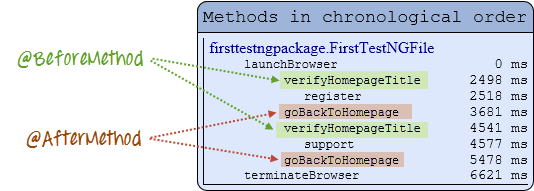
简单地说, @BeforeMethod应该包含需要运行的方法之前 ,而每个测试用例@AfterMethod都应该包含需要运行的方法之后。
TestNG注解摘要
@BeforeSuite : 带注释的方法将在运行此套件中的所有测试之前运行。
@AfterSuite : 带注释的方法将在运行此套件中的所有测试后运行。
@BeforeTest : 带注释的方法将在运行属于标记内类的任何测试方法之前运行。
@AfterTest : 带注释的方法将在属于标记内的类的所有测试方法运行之后运行。
@BeforeGroups : 此配置方法将在其之前运行的组的列表。此方法保证在调用属于任何这些组的第一个测试方法之前不久运行。
@AfterGroups : 此配置方法将在其后运行的组的列表。此方法保证在调用属于这些组中任何一个的最后一个测试方法后不久运行。
@BeforeClass : 带注释的方法将在调用当前类中的第一个测试方法之前运行。
@AfterClass : 带注释的方法将在运行当前类中的所有测试方法后运行。
@BeforeMethod : 带注释的方法将在每个测试方法之前运行。
@AfterMethod : 带注释的方法将在每个测试方法之后运行。
@Test : 带注释的方法是测试用例的一部分
结论
- TestNG是一种测试框架,能够使Selenium测试更容易理解,并生成易于理解测试报告。
-
与JUnit相比,TestNG的主要优势如下。
- 注释更易于使用和理解。
- 测试用例可以更容易地分组。
- 支持并行测试。
-
Eclipse中的控制台窗口生成基于文本的结果,而TestNG窗口提供了测试结果的图形输出以及其他有意义的细节,例如:
- 每个方法的运行过程与状态
- 按时间顺序执行方法
- TestNG能够生成基于HTML的报告。
- 注解可以像Java方法一样使用参数。
- TestNG DataProvider是一种将参数传递到测试函数的方法,它在一次执行中传递测试用例的不同值。