什么是Appium?
Appium是一个免费分发的开源移动应用UI测试框架。Appium支持原生、混合和Web应用程序测试,并支持在物理设备上进行自动化测试,以及用于Android和iOS平台测试脚本的仿真器或Simul单一API。
它不依赖于移动设备操作系统。因为Appium具有框架或包装器,可以根据设备类型(而不是任何操作系统类型)将Selenium Webdriver命令转换为UIAutomation(IOS)或UIAutomator(Android)命令。
Appium支持所有拥有Selenium客户端库的语言,如Java、Objective-C、JavaScript with node.js、PHP、Ruby、Python、C#等。
在本教程中,我们将了解
- Appium是如何工作的?
- 使用Appium的前提条件
- 安装Appium Desktop:
- Appium检查器
- 将Android Emulator附加到Appium
- 用于原生安卓 App(Calculator) 的应用程序测试用例
- 使用Appium的限制
- Appium中常见错误及故障排除步骤
Appium是如何工作的?
- Appium是一个使用Node.js平台编写的“HTTP服务器”,使用Webdriver JSON有线协议驱动iOS和Android会话。因此,在初始化Appium Server之前,必须在系统上预安装Node.js。
- 当下载并安装Appium时,我们的机器上就设置了一个服务器,它公开了一个睡觉应用编程接口。
- 它接收来自客户端的连接和命令求,并在移动设备(Android/iOS)上执行该命令。
-
它使用HTTP响应进行响应。同样,为了执行此求,它使用移动测试自动化框架来构建框架,例如:
- 适用于iOS的Apple Instruments(Instruments仅在装有OS X v10.5和更高版本的Xcode 3.0或更高版本中提供)
- Google UIAutomator for Android API级别16或更高
- 适用于Android API级别15或更低级别的Selendroid
使用Appium的前提条件
- 安装Android SDK(Studio)
- 安装JDK(Java开发工具包)
- 安装Eclipse
- 安装Eclipse的TestNG
- 安装Selenium Server JAR
- Appium客户端库
- Google Play上的APK应用程序信息
- JS(不是必需的-无论何时安装Appium服务器,默认情况下都附带“Node.exe”&npm)。它包含在当前版本的Appium中。)
- 安装Appium Desktop
安装Appium Desktop:
Appium Studio是一个用于安装Appium Server的开源GUI应用程序。它附带了一个记录器,可以创建样板代码来自动化移动应用程序。
步骤1) 转到http://appium.io/并单击Download Appium。

步骤2) 对于Windows,选择exe文件并下载。文件大小约为162MB,根据网速下载需要时间。
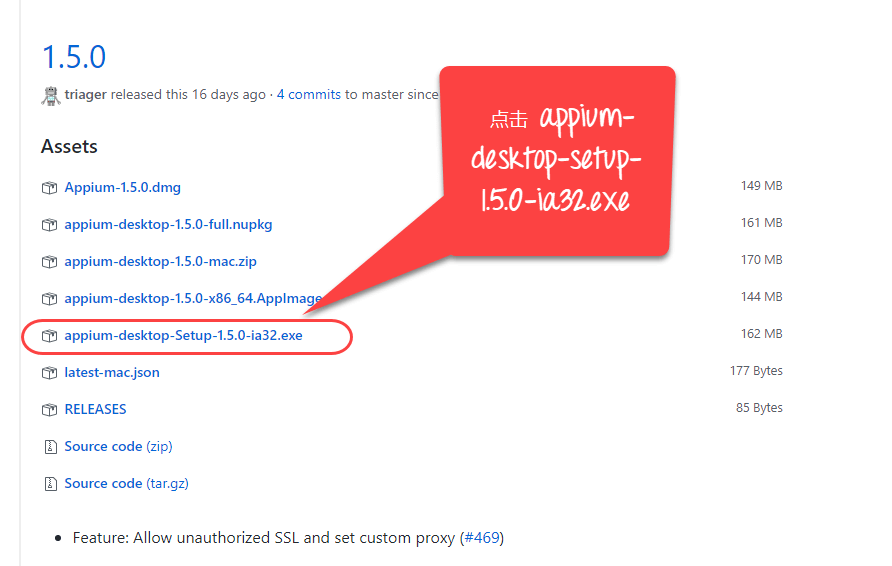
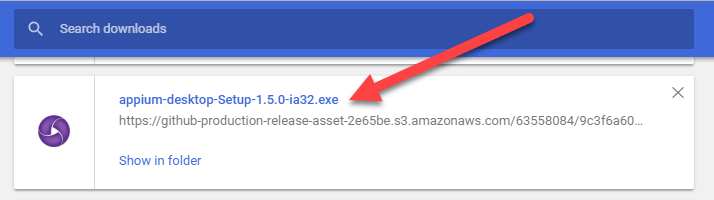
步骤3) 单击下载的exe。
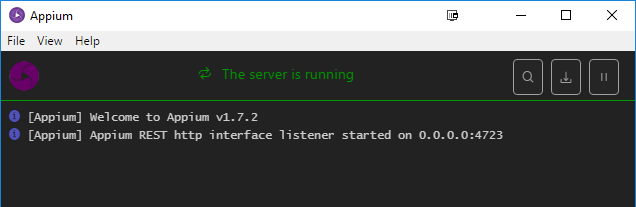
步骤4) 在Windows机器上,不需要安装Appium。单击可执行文件后,将在几分钟内看到以下图像。

对于mac,需要安装dmg
步骤5) 下一步,将看到Server Start(服务器启动)窗口。它填充了它还提到了正在使用的Appium版本。

步骤6) 单击Start Server(启动服务器)按钮,在指定的主机和端口上启动一个新服务器。显示服务器日志输出。
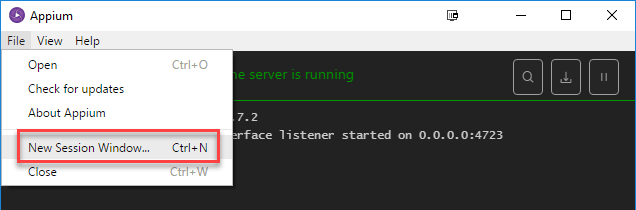
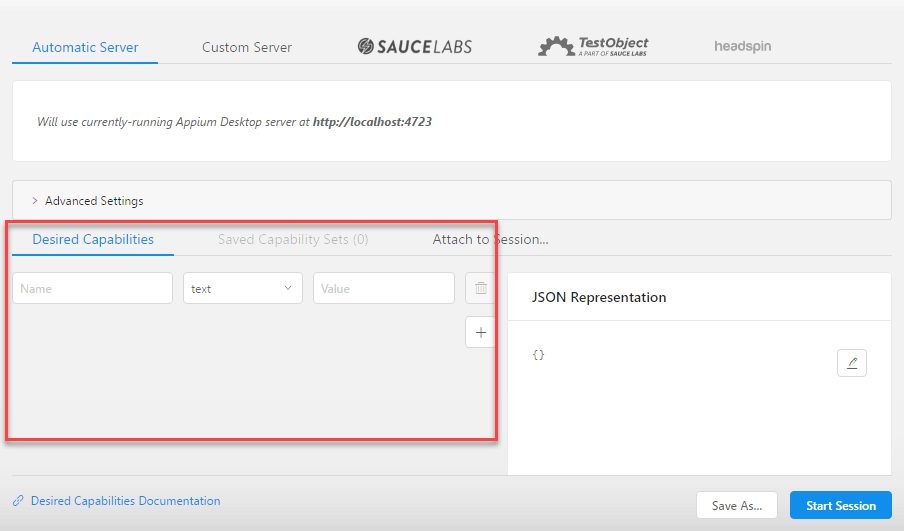
步骤7) 单击新建会话窗口。
步骤8) 可以输入所需的功能并启动会话。
Appium检查器
与Selenium IDE记录和回放工具类似,Appium有一个“检查器”来记录和回放。它可以记录和播放NA,但是,UIAutomator查看器可以用作检查元素的选项。
在Mac计算机上开始使用Appium Inspector的步骤:-
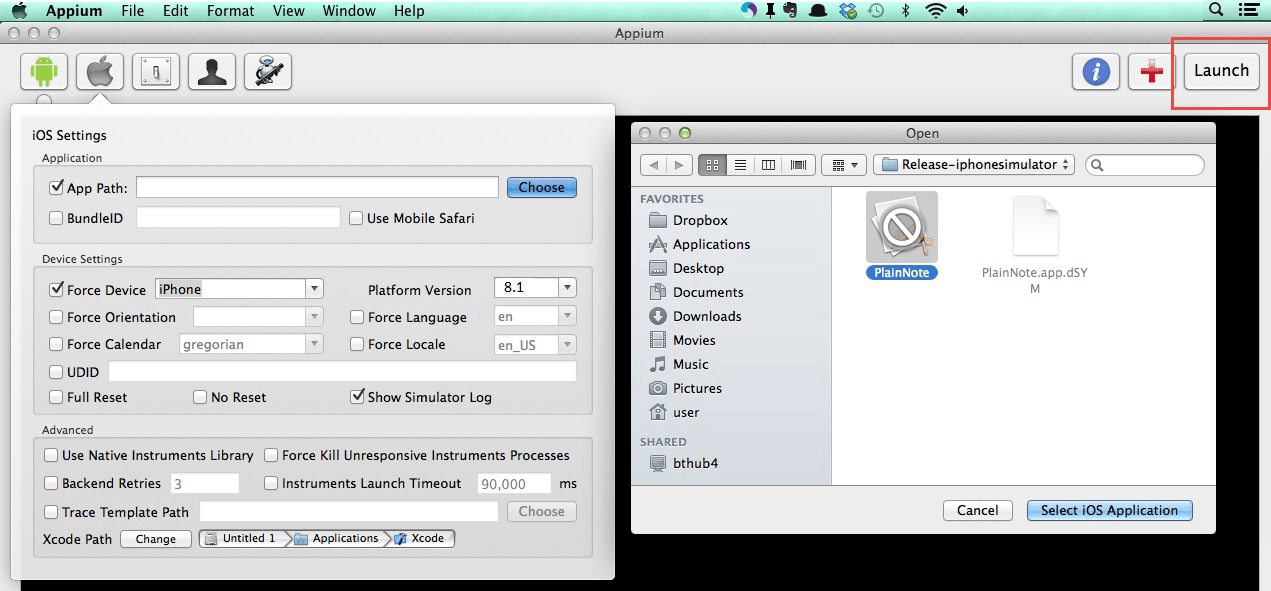
步骤1) 使用默认IP地址0.0.0.0和端口4725下载并启动Appium服务器。
- 从本地选择要测试的源文件或.app文件。
- 选中“应用程序路径”复选框以启用“选择”按钮。
步骤2) 单击“选择”按钮将提供从本地驱动器浏览和选择测试文件的选项。
步骤3) 在Mac机器上启动模拟器。
步骤4) 单击右上角的“启动”按钮,启用蓝色图标。再次单击这个蓝色图标,它将打开带有预先选择的应用程序的Appium检查器和模拟器。
步骤5) 启动Appium Inspector将以列结构显示元素层次结构。此外,用户还可以使用Tap、Swipe等按钮应用操作。
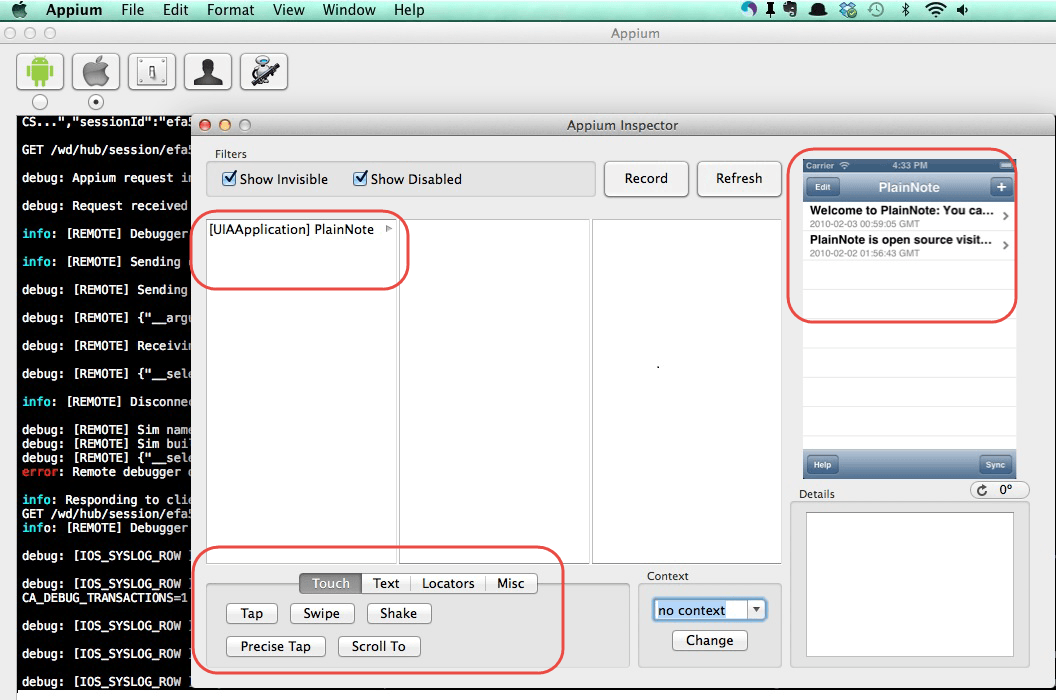
步骤6) 单击“停止”按钮停止录制。
将Android Emulator附加到Appium
步骤1) 在系统中安装Android SDK。
转到“控制面板(Control Pannel Home)”>>“系统和安全( System and Security)”>>“系统(System )”,然后从左侧面板中单击“高级系统设置(Advanced System Settings)”。在“系统属性(System Properties)”弹出窗口中,单击“高级”选项卡,然后单击“环境变量”按钮。
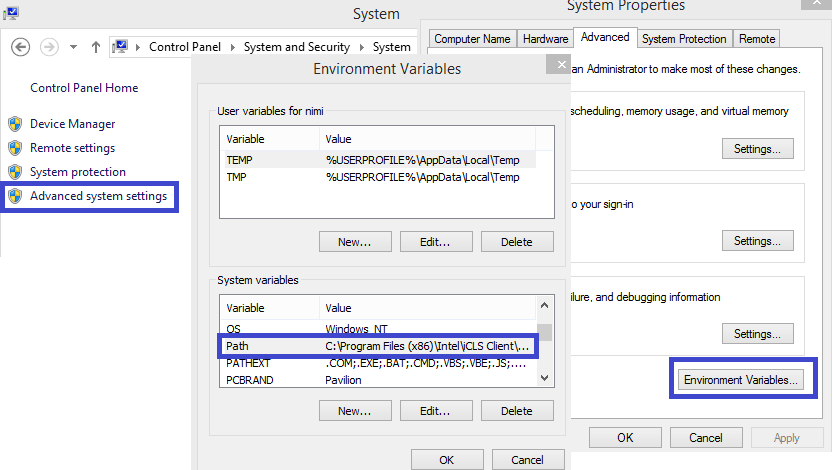
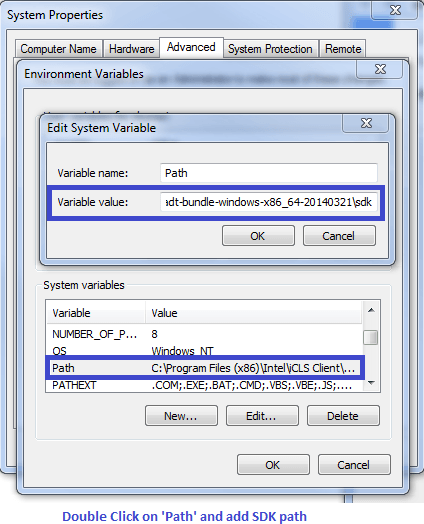
步骤2) 现在,从弹出的‘环境变量’中,双击‘PATH’并设置指向SDK目录的Android_HOME变量。在路径中追加整个SDK文件夹路径。
例如-
C:\User\ABC\Desktop\adt-bundled-windows-x86_64-20140321\sdk
步骤3) 启动Android模拟器或将任何Android设备附加到系统(确保Android设备中启用了Android调试选项)。转到设备设置>>开发人员选项>>选中“调试选项”)。
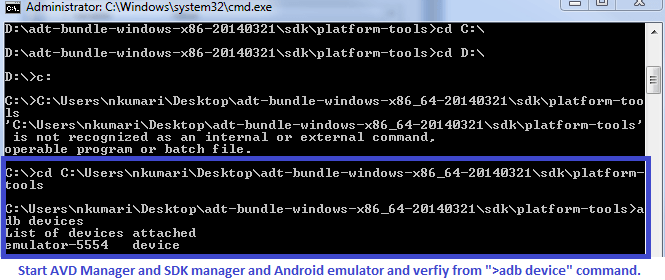
步骤4) 打开命令提示符,导航到Android SDK的-Tools(例如D:-bundle-windows-x86_64-20130514-tools).
步骤5) 运行‘ADB DEVICES’命令。可以看到连接的设备,例如:adb-s模拟器-5554安装<.apk文件的位置>)
步骤6) 运行‘adb start-server’命令。它将启动ADB服务器,Appium将使用该服务器向Android设备发送命令。
步骤7) 导航到系统中的Appium目录并通过单击Appium.exe文件启动Appium。
步骤8) 不更改IP地址或端口号,并单击“启动”按钮。Appium控制台在127.0.0.1:4723开始,如下所示。
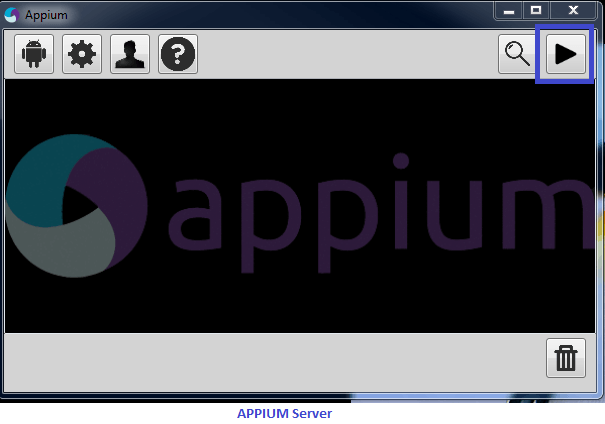
步骤9) 单击“开始”按钮,Appium服务器开始在系统上运行。
用于原生安卓 App(Calculator) 的应用程序测试用例
步骤1) 下载ADT Eclipse插件或在此处单独下载捆绑的ADT
步骤2) 打开Eclipse并创建一个新项目>>包>>类
步骤3) 在新项目中导入Selenium库和TestNG。
步骤4) 现在为“Calculator.app”创建一个小测试程序,以便将两个数字相加。
package src_Appium;
import java.net.MalformedURLException;
import java.net.URL;
import org.openqa.selenium.By;
import org.openqa.selenium.WebDriver;
import org.openqa.selenium.WebElement;
//import org.openqa.selenium.remote.CapabilityType;
import org.openqa.selenium.remote.DesiredCapabilities;
import org.openqa.selenium.remote.RemoteWebDriver;
import org.testng.annotations.*;
public class Calculator {
    WebDriver driver;
    @BeforeClass
    public void setUp() throws MalformedURLException{
//Set up desired capabilities and pass the Android app-activity and app-package to Appium
        DesiredCapabilities capabilities = new DesiredCapabilities();
        capabilities.setCapability("BROWSER_NAME", "Android");
        capabilities.setCapability("VERSION", "4.4.2");
        capabilities.setCapability("deviceName","Emulator");
        capabilities.setCapability("platformName","Android");
        capabilities.setCapability("appPackage", "com.android.calculator2");
// This package name of your app (you can get it from apk info app)
        capabilities.setCapability("appActivity","com.android.calculator2.Calculator"); // This is Launcher activity of your app (you can get it from apk info app)
//Create RemoteWebDriver instance and connect to the Appium server
//It will launch the Calculator App in Android Device using the configurations specified in Desired Capabilities
        driver = new RemoteWebDriver(new URL("https://127.0.0.1:4723/wd/hub"), capabilities);
    }
    @Test
    public void testCal() throws Exception {
//locate the Text on the calculator by using By.name()
        WebElement two=driver.findElement(By.name("2"));
        two.click();
        WebElement plus=driver.findElement(By.name("+"));
        plus.click();
        WebElement four=driver.findElement(By.name("4"));
        four.click();
        WebElement equalTo=driver.findElement(By.name("="));
        equalTo.click();
//locate the edit box of the calculator by using By.tagName()
        WebElement results=driver.findElement(By.tagName("EditText"));
//Check the calculated value on the edit box
        assert results.getText().equals("6"):"Actual value is : "+results.getText()+" did not match with expected value: 6";
    }
    @AfterClass
    public void teardown() {
//close the app
        driver.quit();
    }
}
从“AVD管理器”中选择Appium Server和Android Emulator,然后单击Run(运行)>>TestNG(TestNG)。上面的程序将在选定的仿真器上运行‘Calculator.app’,并使用TestNG框架在Eclipse控制台下显示结果。
使用Appium的限制
- Appium不支持测试低于4.2的Android版本
- 对混合应用程序测试的支持有限。例如:不可能测试应用程序从网络应用程序到本地应用程序的切换动作,反之亦然。
- 不支持在Microsoft Windows上运行Appium Inspector。
Appium中常见错误及故障排除步骤
| 错误 | 故障排除步骤 |
|---|---|
| 1. The following desired capabilities are required, but were not provided: device Name, platformName | 在Appium脚本中添加所需的功能:设备名称、平台名称。capabilities.setCapability(“platformName”,“Android”); |
| 2. Could not find adb. Please set the ANDROID_HOME environment variable with the | 需要在系统‘环境变量’的‘路径’列中设置SDK根目录路径 |
| 3.org.openqa.selenium.SessionNotCreatedException: A new session could not be created. | 需要设置正确的App路径并重新启动Appium服务器。 |
| 4. 如何在移动应用程序中查找DOM元素或XPath? | 使用‘UIAutomatorviewer’查找Android应用程序的DOM元素。 |