在本教程中,将学习如何将Cucumber与Selenium Webdriver集成。
Cucumber是什么?
Cucumber是一种支持行为驱动开发(BDD)的测试方法。它使用小Cucumber语言用简单的英文文本解释了应用程序的行为。
什么是Selenium?
Selenium是一个自动化工具,用于对基于Web的应用程序进行功能测试。Selenium支持不同的语言,如java、ruby、python C#等。
在这个Cucumber教程中,将学习-
- 为什么要用含Selenium的Cucumber?
- 使用含SeleniumCucumber的前提条件。
- 使用含SeleniumCucumber进行自动化测试。
- 场景1:在控制台中打印文本。
- 场景2:输入登录凭据并重置值。
- 场景3:在Guru99上输入登录凭据并重置值。对3组数据执行此操作。
为什么要用含Selenium的Cucumber?
Cucumber和Selenium是两种流行的技术。
大多数组织使用Selenium进行功能测试。这些使用Selenium的组织希望将Selenium与Cucumber集成,因为Cucumber使其易于阅读和理解应用流程。
Cucumber Tool基于行为驱动开发框架(Behavior Driven Development Framework),该框架充当以下人员之间的桥梁:
- 软件工程师和业务分析师。
- 手动测试仪和自动化测试仪。
- 手动测试人员和开发人员。
Cucumber BDD框架也有利于客户端理解应用程序代码,因为它使用纯文本的小Cucumber语言。小Cucumber的语法是简单的文本,易于阅读和理解。

使用含Selenium Cucumber的前提条件
在开始集成CucumberSelenium之前,我们需要以下几项:
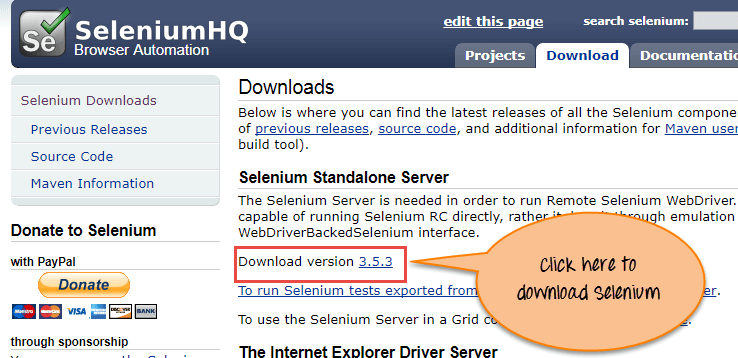
- Selenium JAR文件:
- Selenium-服务器-单机版
可从http://www.seleniumhq.org/download/下载
Cucumber的JAR文件:
- Cucumber-core
- Cucumber-html
- cobertura code coverage
- Cucumber-java
- Cucumber-junit
- Cucumber-jvm-deps
- Cucumber-reporting
- Hemcrest-core
- Gherkin
- Junit
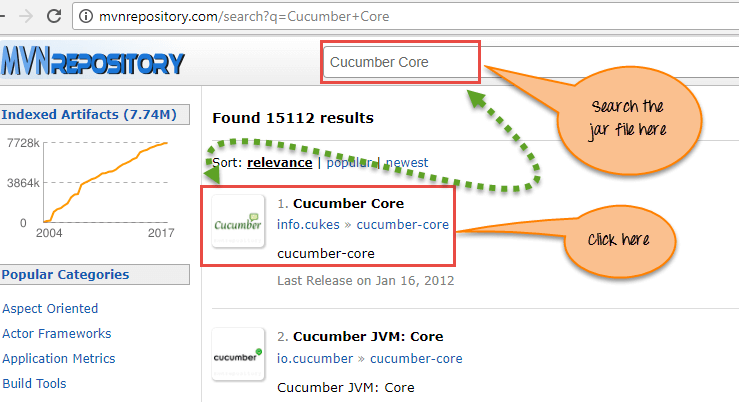
可从https://mvnrepository.com/search?q=Cucumber下载
需要搜索文件并逐个下载。
例如,我们将向展示如何下载其中一个JAR文件,即“Cucumber-core”。
点击上面的下载链接。“Cucumber核”截图如下所示:
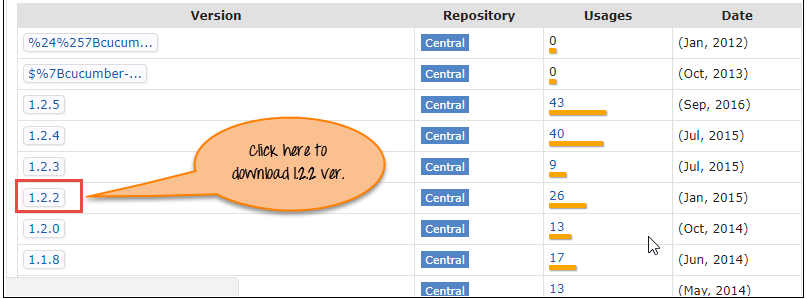
在下一页中,单击版本1.2.2,
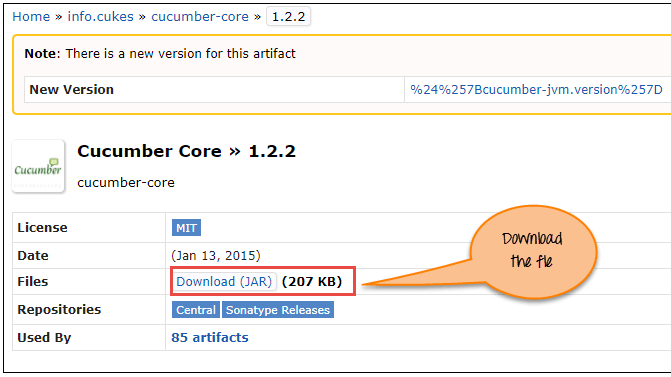
在下一个屏幕中,单击Download以获取“Cucumber Core”JAR文件。
注意:为方便起见,我们捆绑了需要从Maven下载的JAR文件。随着时间的推移,这些JAR可能会更新并变得不兼容,需要使用上面说明的方法下载它们。
使用含SeleniumCucumber进行自动化测试。
让我们一步一步研究加SeleniumCucumber的使用步骤。这里我们将介绍3个场景:
- 场景1:在控制台中打印文本。
- 场景2:输入登录凭据并重置值。
- 场景3:在Guru99上输入登录凭据并重置值。对3组数据执行此操作。
场景1:在控制台中打印文本。
在此场景中,我们只使用Cucumber在控制台中打印文本。
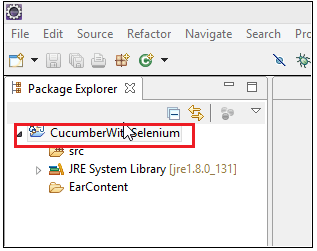
步骤1)在Eclipse中创建项目。
创建名为“CucumberWithSelenium”的Java项目,如下面的屏幕截图所示。

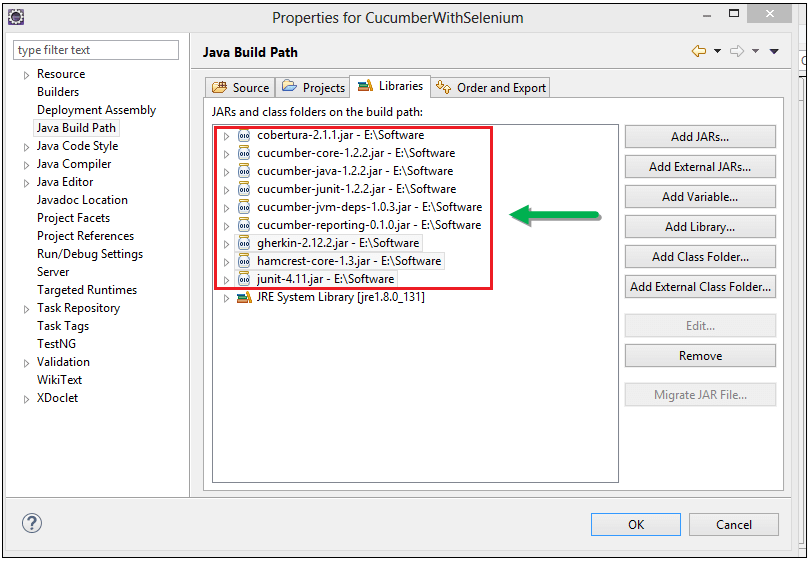
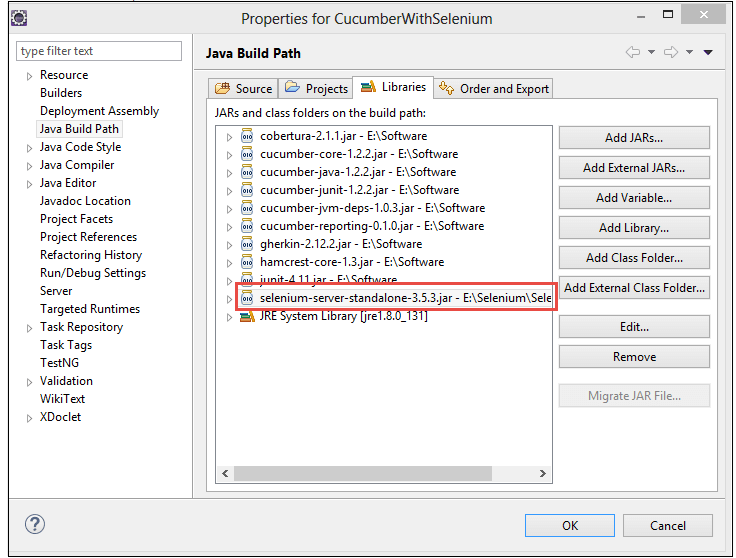
步骤2)在工程中添加Jar文件。
右键单击项目>选择属性>转到Java构建路径。添加之前下载的所有库。
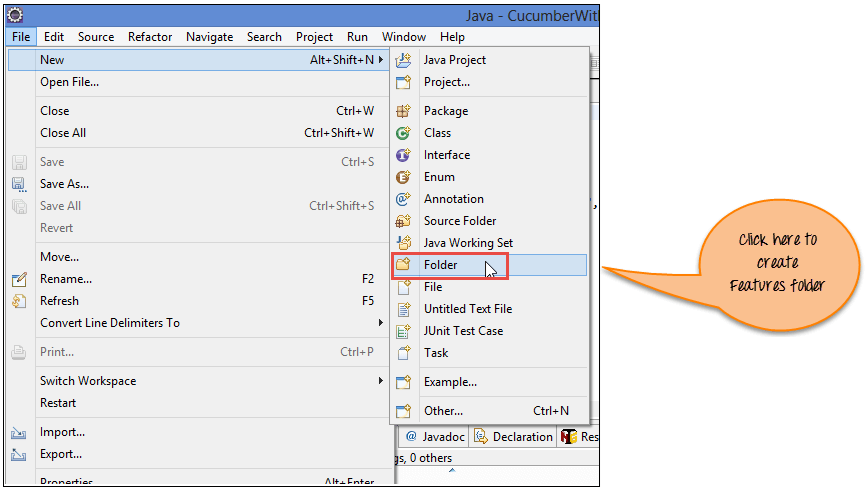
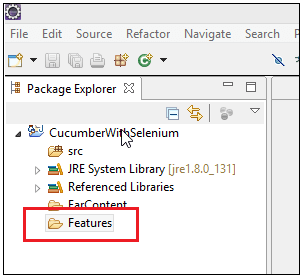
步骤3)创建要素文件
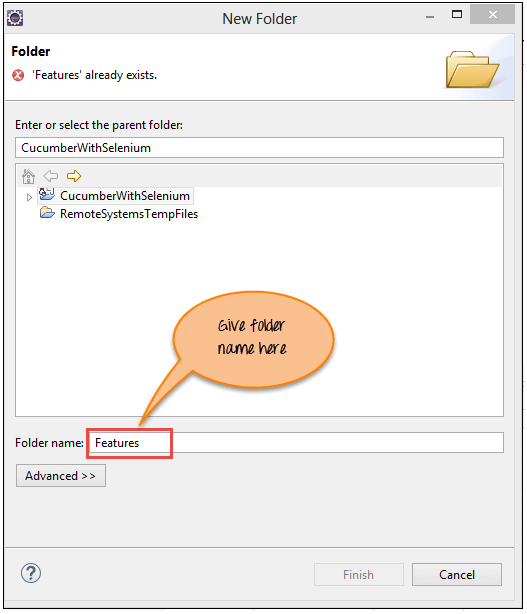
要创建特征文件,首先创建特征文件夹,如下面的屏幕截图所示。
现在输入文件夹名称‘Feature’,然后单击‘Finish’按钮。
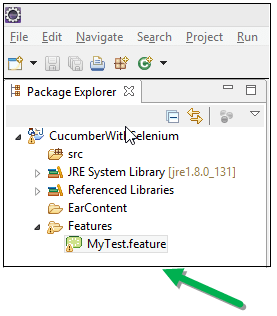
现在,在‘Feature’文件夹中创建名为“MyTest.Feature”的要素文件-过程类似于创建文件夹
注意:可能需要安装Cucumber Eclipse插件才能正常工作。转到–帮助->安装新软件->复制粘贴链接http://cucumber.github.io/cucumber-eclipse/update-site/并安装
步骤4)编写场景。
以下各行使用小Cucumber语言写入‘MyTest.Feature’文件中,如下所示:
Feature:
Reset functionality on login page of Application
Scenario:
Verification of Reset button
Given Open the Firefox and launch the application
When Enter the Username and Password
Then Reset the credential
代码说明
第1行)在此行中,我们编写业务功能。
第2行)在该行中,我们编写一个场景进行测试。
第3行)在该行中,我们定义前提条件。
第4行)在此行中,我们定义了需要执行的操作。
第4行)在此行中,我们定义预期结果或结果。
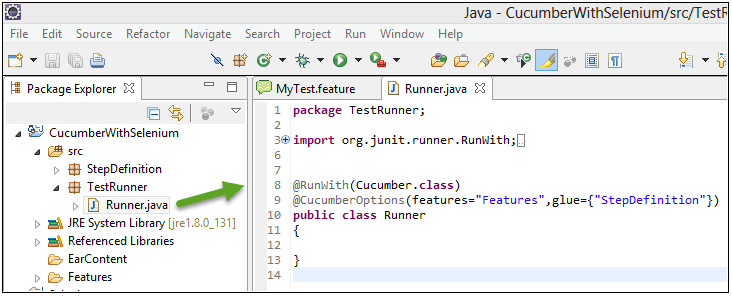
步骤5)为SeleniumCucumber框架设计编写Selenium Tstrunner脚本
这里我们创建“TestRunner”包,然后在它下面创建“Runner.java”类文件。
package TestRunner;
import org.junit.runner.RunWith;
import cucumber.api.CucumberOptions;
import cucumber.api.junit.Cucumber;
@RunWith(Cucumber.class)
@CucumberOptions(features="Features",glue= {"StepDefinition"})
public class Runner {
}
在上面的Cucumber Java示例代码中,我们使用以下注释运行Cucumber测试:
@RunWith () 注释告诉我们开始执行测试的测试运行器类。
@CucmberOptions () 注释用于设置我们的Cucumber测试的一些属性,如特征文件、步骤定义等。
TestRunner文件的屏幕快照。
步骤6)创建步骤定义脚本。
现在,我们在这里创建“StepDefinition”包,然后在它下面创建“Steps.java”脚本文件。在这里,我们实际上编写了一个Selenium脚本来在Cucumber方法下执行测试。
package StepDefinition;
import cucumber.api.java.en.Given;
import cucumber.api.java.en.Then;
import cucumber.api.java.en.When;
public class Steps {
    @Given("^Open the Firefox and launch the application$")
    public void open_the_Firefox_and_launch_the_application() throws Throwable {
        System.out.println("This Step open the Firefox and launch the application.");
    }
    @When("^Enter the Username and Password$")
    public void enter_the_Username_and_Password() throws Throwable {
        System.out.println("This step enter the Username and Password on the login page.");
    }
    @Then("^Reset the credential$")
    public void Reset_the_credential() throws Throwable {
        System.out.println("This step click on the Reset button.");
    }
}
在上面的代码中,使用名称“steps”创建了类。Cucumber注记用于特征文件的映射。定义了每种注释方法:
@Given定注释定义打开Firefox并启动应用程序的方法
@When注释定义输入用户名和密码的方法
@Then注释定义重置凭证的方法
在每种方法下,我们只打印一条消息。
下面是“Steps.java”脚本和项目树的屏幕截图,看起来是什么样子。
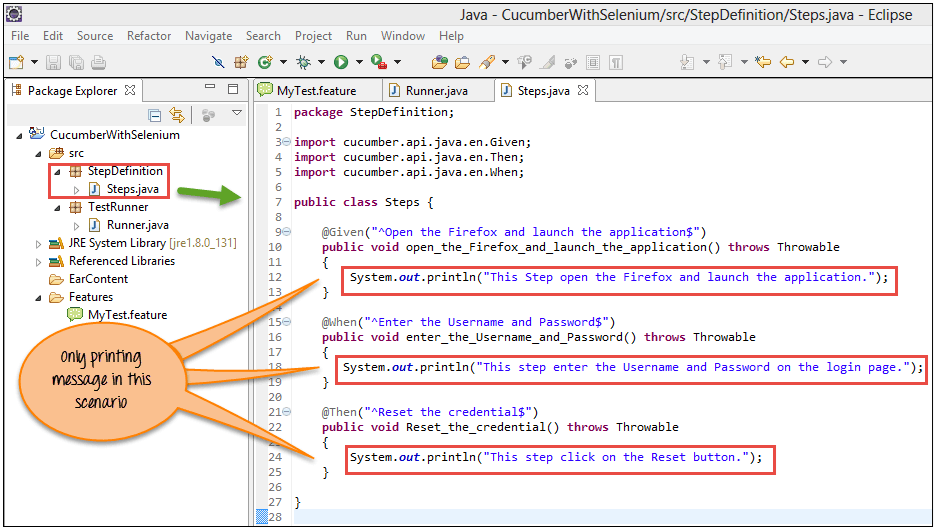
注意:步骤定义只是想要在此Cucumber方法下执行的步骤。
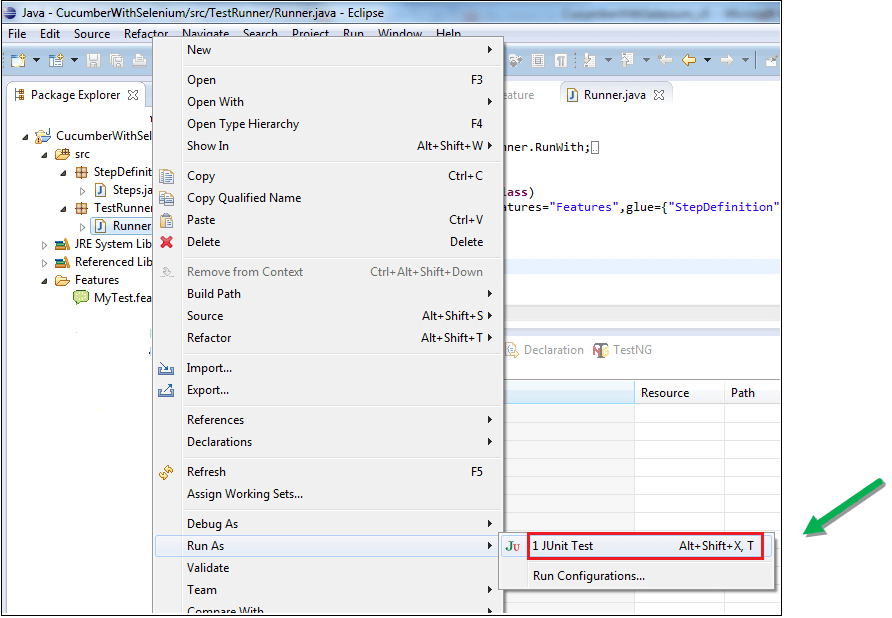
步骤7)执行脚本。
用户可以从Test Runner脚本执行此脚本,即‘Runner.java’,如下面的屏幕截图所示。
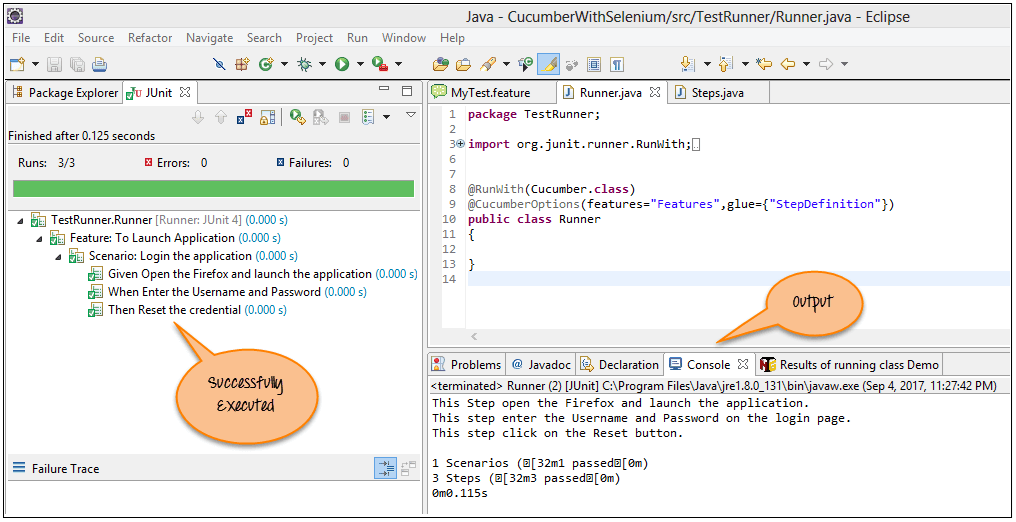
步骤8)分析输出。
在执行“Runner.java”脚本时,它会在控制台上显示文本。它与“Steps.java”脚本中定义的文本相同。
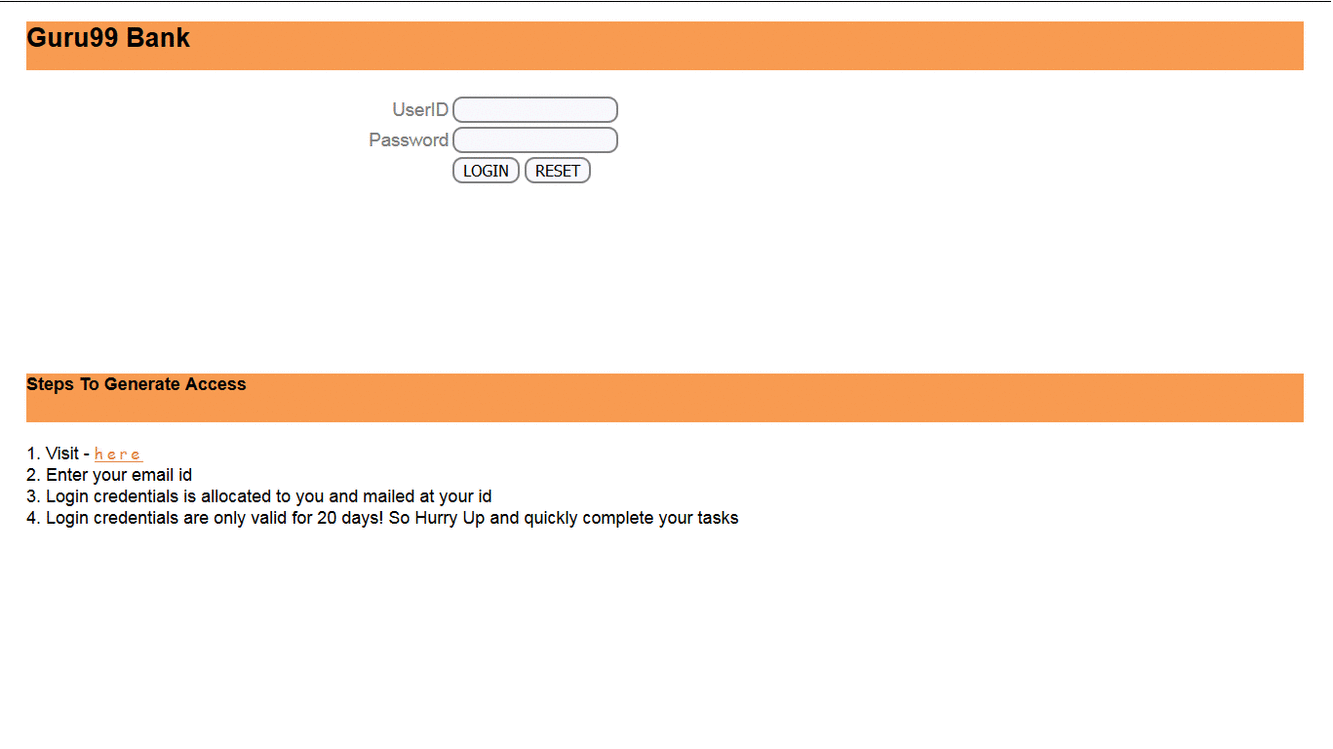
场景2:输入登录凭据并重置值。
在这里,我们只需在Guru99演示登录页面上输入凭据并重置值
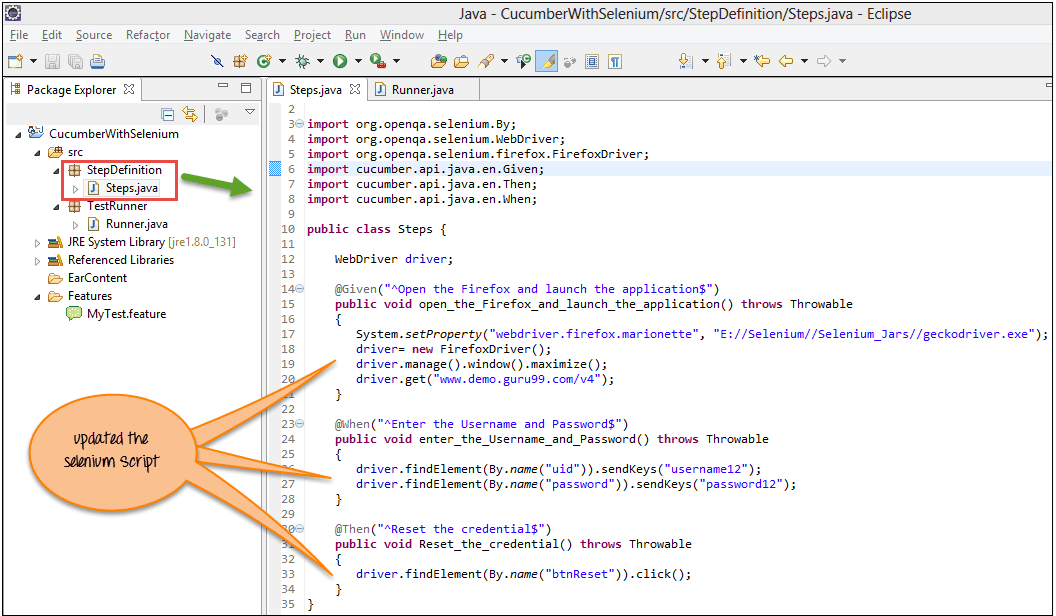
对于场景2,我们只需要更新“Steps.java”脚本。这里,首先,我们需要将Selenium JAR文件添加到此项目中。
步骤1)这里我们更新‘Steps.java’脚本,如下面的代码和屏幕截图所示。
package StepDefinition;
import org.openqa.selenium.By;
import org.openqa.selenium.WebDriver;
import org.openqa.selenium.firefox.FirefoxDriver;
import cucumber.api.java.en.Given;
import cucumber.api.java.en.Then;
import cucumber.api.java.en.When;
public class Steps {
    WebDriver driver;

    @Given("^Open the Firefox and launch the application$")
    public void open_the_Firefox_and_launch_the_application() throws Throwable {
        System.setProperty("webdriver.gecko.driver", "E://Selenium//Selenium_Jars//geckodriver.exe");
        driver= new FirefoxDriver();
        driver.manage().window().maximize();
        driver.get("http://www.itxiaonv.com/v4");
    }
    @When("^Enter the Username and Password$")
    public void enter_the_Username_and_Password() throws Throwable {
        driver.findElement(By.name("uid")).sendKeys("username12");
        driver.findElement(By.name("password")).sendKeys("password12");
    }
    @Then("^Reset the credential$")
    public void Reset_the_credential() throws Throwable {
        driver.findElement(By.name("btnReset")).click();
    }
}
上述Selenium脚本的屏幕截图。
步骤2)执行脚本。
更新之后,我们运行Runner.java。
步骤3)分析输出。
在输出中,可以看到以下内容:
- 浏览器已启动。
- Guru99 Bank演示站点开通。
- 用户名和密码放在登录页面上。
- 重置这些值。
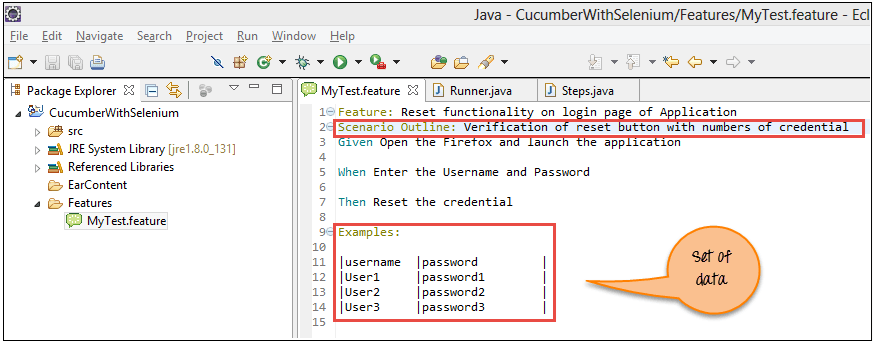
场景3:在Guru99上输入登录凭据并重置值。对3组数据执行此操作。
在这里,我们需要更新‘Step.java’和功能文件。
步骤1)更新功能文件,如下所示:
Here we update the feature file with 'Scenario Outline' and  'examples' syntax.
Feature:
Reset functionality on login page of Application
Scenario Outline:
Verification of reset button with numbers of credential
Given Open the Firefox and launch the application
When Enter the Username <username>and Password <password>
Then Reset the credential
Examples:
|username  |password         |
|User1     |password1        |
|User2     |password2        |
|User3     |password3        |
// In this line we define the set of data.
步骤2)现在更新Step.java脚本。
这里我们更新方法以传递参数,更新后的脚本如下所示:
package StepDefinition;
import org.openqa.selenium.By;
import org.openqa.selenium.WebDriver;
import org.openqa.selenium.firefox.FirefoxDriver;
import cucumber.api.java.en.Given;
import cucumber.api.java.en.Then;
import cucumber.api.java.en.When;
public class Steps {
    WebDriver driver;

    @Given("^Open the Firefox and launch the application$")
    public void open_the_Firefox_and_launch_the_application() throws Throwable {
        System.setProperty("webdriver.gecko.driver", "E://Selenium//Selenium_Jars//geckodriver.exe");
        driver= new FirefoxDriver();
        driver.manage().window().maximize();
        driver.get("www.www.itxiaonv.com/v4");
    }
    @When("^Enter the Username \"(.*)\" and Password \"(.*)\"$")
    public void enter_the_Username_and_Password(String username,String password) throws Throwable {
        driver.findElement(By.name("uid")).sendKeys(username);
        driver.findElement(By.name("password")).sendKeys(password);
    }
    @Then("^Reset the credential$")
    public void Reset_the_credential() throws Throwable {
        driver.findElement(By.name("btnReset")).click();
    }
}
步骤3)现在执行更新后的脚本。
下面的屏幕显示了脚本的成功执行和每组数据所需的时间。
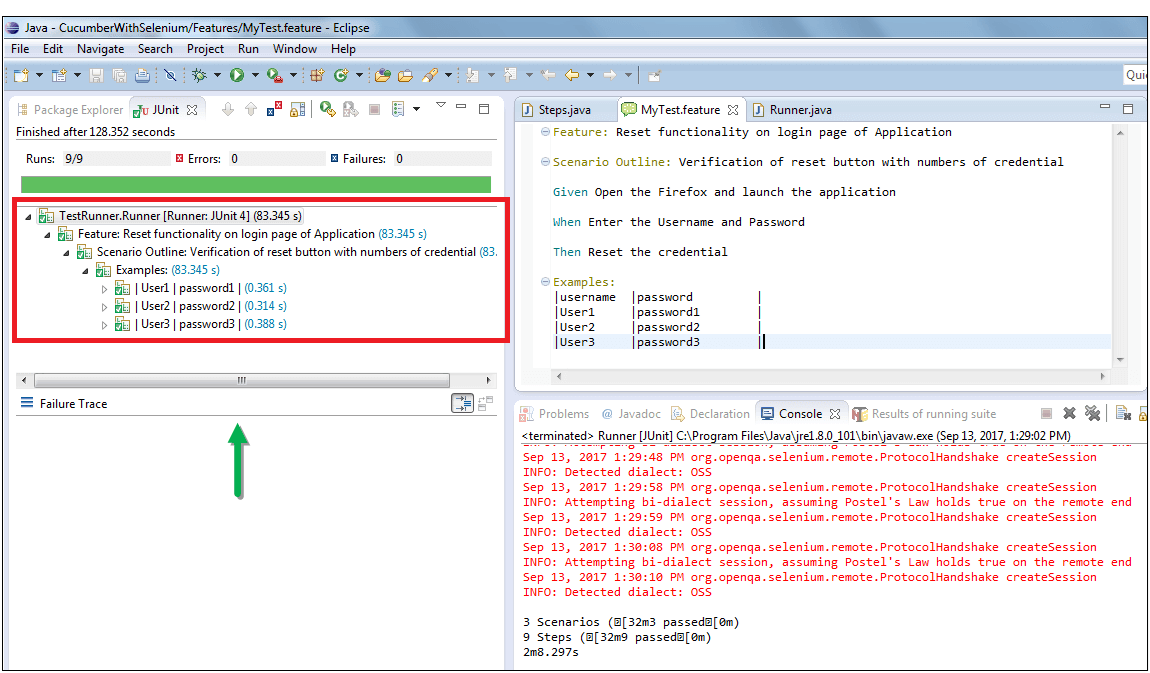
步骤4)分析输出。
在输出中,可以看到以下内容:
对于数据集的数量,即3个集,重复下面的输出。
- 浏览器已启动。
- Guru99 Bank演示站点开通。
- 用户名和密码放在登录页面上。
- 重置这些值。

结论。
Cucumber是一个非常流行的BDD工具。它易于阅读,所有利益相关者,包括技术人员和非技术人员都能理解。
Cucumber可以通过以下3个步骤与Selenium整合
- 创建特征文件,使用小Cucumber语言逐步定义特征和场景。
- 创建Testrunner文件。在这个文件中,我们集成了Cucumber和BDD,我们执行这个脚本。
- 创建步骤定义,这是在此包下定义的实际Selenium脚本。