一些web应用程序具有将web元素拖放到定义区域或元素上的功能。我们可以使用Selenium Webdriver自动拖放这些元素。
拖放的语法。
Actions类有两个支持拖放的方法。我们来研究一下-
Actions.dragAndDrop(Sourcelocator, Destinationlocator)
在dragAndDrop方法中,我们传递两个参数-
- 第一个参数“Sourcelocator”是我们需要拖动的元素
- 第二个参数“Destinationlocator”是我们需要将第一个元素拖放到的元素
Actions.dragAndDropBy(Sourcelocator, x-axis pixel of Destinationlocator, y-axis pixel of Destinationlocator)
dragAndDropBy方法我们传递3个参数-
- 第一个参数“Sourcelocator”是我们需要拖动的元素
- 第二个参数是x轴像素值,我们需要将第一个元素放在该元素上。
- 第三个参数是需要将第一个元素放在其上的第二个元素的y轴像素值。
通过以下3个场景,让我们实际向展示如何使用Selenium Webdriver拖放元素
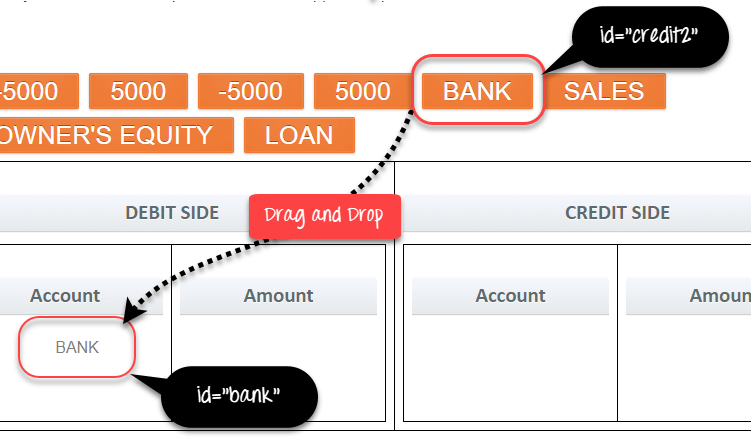
- 场景1:使用DragAndDrop方法将Bank元素拖放到特定元素上。
- 场景2:使用DragAndDrop方法将Bank元素拖放到特定元素上。
- 场景3:拖放几个元素,然后验证消息是否显示。
场景1:DragAndDrop方法将Bank元素拖放到特定单元格上。
在下面的代码中,我们在Firefox浏览器中启动给定的url,然后通过dragAndDrop方法将bank元素拖放到方格上。
import org.openqa.selenium.By;
import org.openqa.selenium.WebDriver;
import org.openqa.selenium.WebElement;
import org.openqa.selenium.chrome.ChromeDriver;
import org.openqa.selenium.interactions.Actions;
import org.testng.annotations.Test;
public class DragAndDrop {
    WebDriver driver;
    @Test
    public void DragnDrop() {
        System.setProperty("webdriver.chrome.driver"," E://Selenium//Selenium_Jars//chromedriver.exe ");
        driver= new ChromeDriver();
        driver.get("http://www.itxiaonv.com/test/drag_drop.html");
        //Element which needs to drag.
        WebElement From=driver.findElement(By.xpath("//*[@id='credit2']/a"));
        //Element on which need to drop.
        WebElement To=driver.findElement(By.xpath("//*[@id='bank']/li"));

        //Using Action class for drag and drop.
        Actions act=new Actions(driver);
        //Dragged and dropped.
        act.dragAndDrop(From, To).build().perform();
    }
}
代码说明:在上面的代码中,我们在Firefox浏览器中启动给定的url,然后通过dragAndDrop方法将bank元素拖放到另一个方格上。下面简要说明:
首先,我们捕获1个 我们需要拖入变量“from”的元素。
WebElement From=driver.findElement(By.xpath("//*[@id='credit2']/a"));
其次,我们捕获需要将变量“to”中的第一个元素放在其上的第二个元素。
WebElement To=driver.findElement(By.xpath("//*[@id='bank']/li"));
第三,在使用Actions类的方法时,创建Actions类的对象。
Actions act=new Actions(driver);
对于拖放元素,我们使用Actions类的DragAndDrop方法,并将参数作为第一个元素(Sourcelocator)“From”和第二个 element(Destinationlocator) “To”传递。下面的线条将拖动%1 ST 元素并将其拖放到2 发送 元素。
act.dragAndDrop(From, To) .build().performance();
脚本的执行。
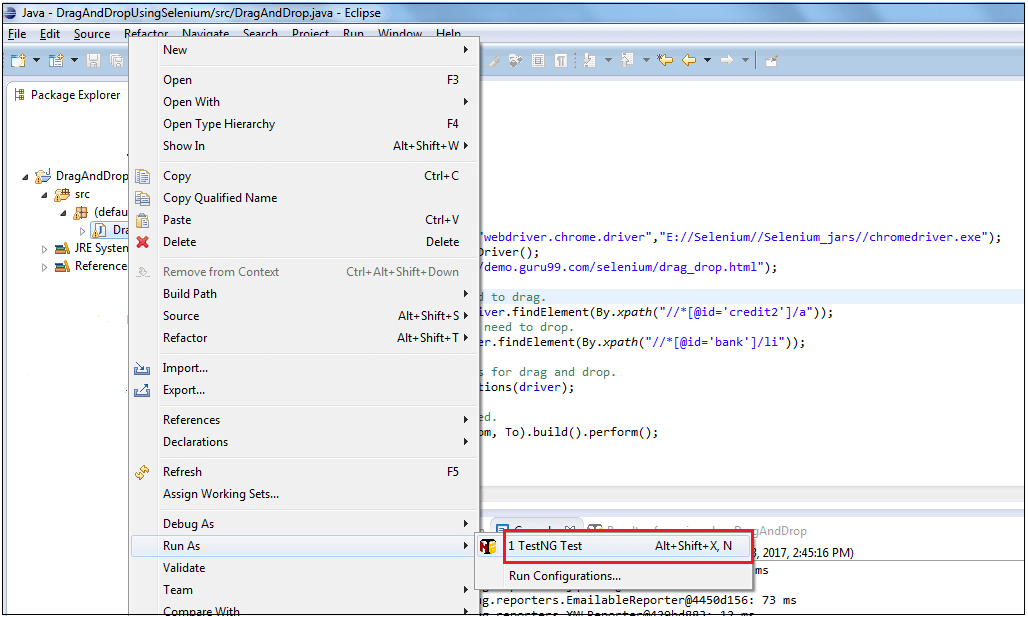
现在可以从Eclipse逐个执行上面的脚本,如下面的屏幕截图所示。
以下是运行该脚本时的输出

场景2:DragAndDrop方法将Bank元素拖放到特定单元格上。
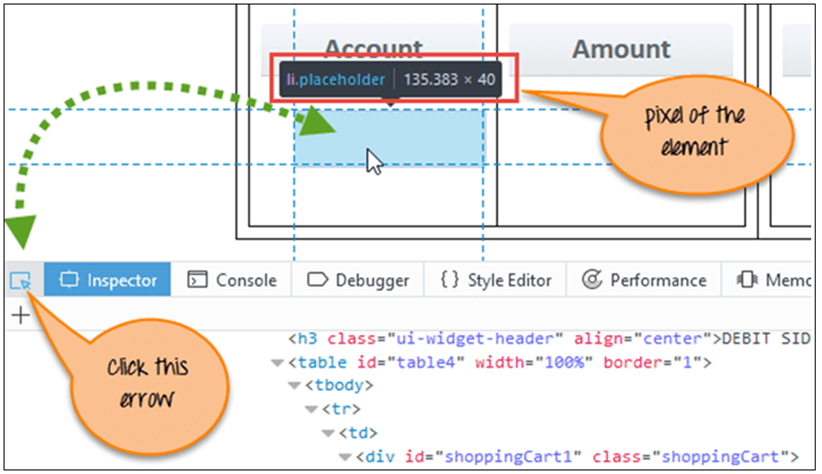
在这个场景中,我们在浏览器中启动给定的url,然后通过dragAndDropBy方法将bank元素拖放到借方挡路上。要进行DragAndDropBy,我们需要找到元素的像素。
如何找到Pixel?
在Chrome或Firefox中打开URL,然后单击蓝色箭头。
接下来,单击想要了解其像素的任何元素。
将发现元素上方的像素,如下面的屏幕截图所示。
import org.openqa.selenium.By;
import org.openqa.selenium.WebDriver;
import org.openqa.selenium.WebElement;
import org.openqa.selenium.chrome.ChromeDriver;
import org.openqa.selenium.interactions.Actions;
import org.testng.annotations.Test;
public class DragAndDrop {
    WebDriver driver;
    @Test
    public void DragnDrop() {
        System.setProperty("webdriver.chrome.driver","E://Selenium//Selenium_Jars//chromedriver.exe");
        driver= new ChromeDriver();
        driver.get("http://www.itxiaonv.com/test/drag_drop.html");
        //Element(BANK) which need to drag.
        WebElement From=driver.findElement(By.xpath("//*[@id='credit2']/a"));
        //Using Action class for drag and drop.
        Actions act=new Actions(driver);
        //Drag and Drop by Pixel.
        act.dragAndDropBy(From,135, 40).build().perform();
    }
}
注意:像素值随屏幕分辨率和浏览器大小而变化。因此,这种方法不可靠,没有得到广泛应用。
场景3:拖放几个元素,然后验证消息是否显示。
在下面的代码中,我们在浏览器中启动给定的URL,然后将BANK、SALES和DROP等元素拖放到各自的目的地。一旦完成,我们将验证输出消息。
import org.openqa.selenium.By;
import org.openqa.selenium.WebDriver;
import org.openqa.selenium.WebElement;
import org.openqa.selenium.chrome.ChromeDriver;
import org.openqa.selenium.interactions.Actions;
import org.testng.annotations.Test;
public class DragAndDrop {
    WebDriver driver;
    @Test
    public void DragnDrop() {
        System.setProperty("webdriver.chrome.driver"," E://Selenium//Selenium_Jars//chromedriver.exe");
        driver= new ChromeDriver();
        driver.get("http://www.itxiaonv.com/test/drag_drop.html");
        //Element(BANK) which need to drag.
        WebElement From1=driver.findElement(By.xpath("//*[@id='credit2']/a"));
        //Element(DEBIT SIDE) on which need to drop.
        WebElement To1=driver.findElement(By.xpath("//*[@id='bank']/li"));
        //Element(SALES) which need to drag.
        WebElement From2=driver.findElement(By.xpath("//*[@id='credit1']/a"));
        //Element(CREDIT SIDE) on which need to drop.
        WebElement To2=driver.findElement(By.xpath("//*[@id='loan']/li"));
        //Element(500) which need to drag.
        WebElement From3=driver.findElement(By.xpath("//*[@id='fourth']/a"));
        //Element(DEBIT SIDE) on which need to drop.
        WebElement To3=driver.findElement(By.xpath("//*[@id='amt7']/li"));
        //Element(500) which need to drag.
        WebElement From4=driver.findElement(By.xpath("//*[@id='fourth']/a"));
        //Element(CREDIT SIDE) on which need to drop.
        WebElement To4=driver.findElement(By.xpath("//*[@id='amt8']/li"));
        //Using Action class for drag and drop.
        Actions act=new Actions(driver);
        //BANK drag and drop.
        act.dragAndDrop(From1, To1).build().perform();
        //SALES drag and drop.
        act.dragAndDrop(From2, To2).build().perform();
        //500 drag and drop debit side.
        act.dragAndDrop(From3, To3).build().perform();
        //500 drag and drop credit side.
        act.dragAndDrop(From4, To4).build().perform();
        //Verifying the Perfect! message.
        if(driver.findElement(By.xpath("//a[contains(text(),'Perfect')]")).isDisplayed()) {
            System.out.println("Perfect Displayed !!!");
        } else {
            System.out.println("Perfect not Displayed !!!");
        }
    }
产出分析
在输出中,可以看到元素被拖放到定义的元素上。可以检查输出的GIF。
浏览器不支持视频标签。
总结
- 在上述教程中,我们将通过WebDriver中的Action方法演示Web应用程序的拖放功能:
- dragAndDrop(Sourcelocator, Destinationlocator)
- dragAndDropBy(Sourcelocator, x-axis pixel of Destinationlocator, y-axis pixel of Destinationlocator)